Planning a Scan to BIM Project: A Step-by-Step Guide
Surveyors often find themselves with incomplete site data, architects are delayed using as-builts which are inaccurate, and engineers are stuck with outdated and/or inconsistent drawings messing with their design decisions. All of these complications can turn into costly rework, delays, and coordination problems with construction and renovation.
A survey by Becht says, “Between 2% and 20% of total costs is the estimated amount of rework, which has a negative impact on a project schedule.”
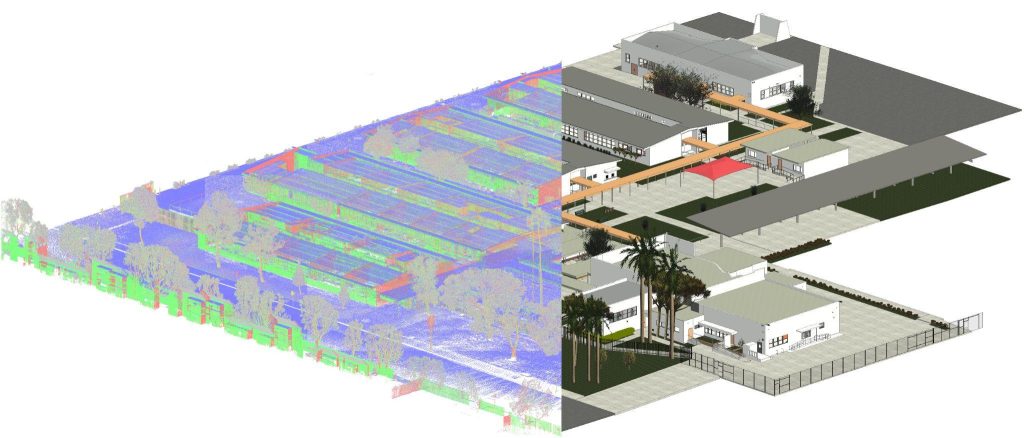
That is where Scan to BIM comes into play as a really good thing. Scan to BIM Services is the process of taking the conditions of the real-world that have been captured through a 3D laser scan and developing accurate Building Information Models (BIM). The 3D Laser scanned point clouds can be turned into accurate 3D models allowing a very detailed and data-rich digital version of the built environment. This includes any environment (an old heritage structure or the complex of the MEP system) will become data driven from the start of the decision making process.
This requires some planning. The aim is to address through planning, scope, methods of scanning, and modelling standards. Having a planned Scan to BIM process can reduce errors, time, and cost. More industries of the AEC sector including renovation and retrofit work, and facility management are turning to Scan to BIM to improve process, and building lifecycle management, and to advance their working methods.
This article will outline the top steps and best practices for developing the strategy for an effective Scan to BIM project in the USA so you get accuracy, efficiency, and value on day one.
Best Practices for Planning a Scan to BIM Project
Planning is the foundation for any successful Point Cloud to BIM Services. A well-organized plan helps with clarifying the project scope to avoid misinterpretation, minimal model errors, and keep field data and project goals aligned.
Step 1 – Define the Project Scope
Be clear on expectations and deliverables for the project. This is the basis for every step to follow.
- Establish Project Aims:
- Understand project purpose – Is it for a renovation, retrofit, as-built, clash detection, or to support facility management?
- Establish Deliverables:
- Have a good idea of LOD (LOD 200-500) or format (RVT, IFC, DWG) or any discipline (architecture, MEP, structure, etc.)
- Determine modeling scope:
- A list of the elements to be modeled i.e., building architectural shell only or building full services integration including the HVAC system, plumbing, and electrical.
Step 2 – Pre-Scanning Preparation
Preparation is key to ideally capturing quality data and consistent workflow for Scan to BIM.
- Site Assessment:
- It is important to assess physical conditions on site, such as accessibility to the property, available lighting conditions (if scanning inside), and physical barriers.
- Placement Assessment of the scanner (and people) is useful for planning a coverage strategy that reduces the degree of blind spots while also providing adequate coverage for the scan.
- Choosing the Appropriately Equipment:
- Choose between terrestrial, mobile, or UAV (unmanned aerial vehicle) based 3D laser scanners relative to the type and complexity of the building.
- Choose between LiDAR (Light Detection and Ranging) or photogrammetry, whichever is required for accuracy and surface conditions.
- Safety & Permissions:
- Follow appropriate safety protocols for the site.
- Acquire any required scanning permissions and approvals from stakeholders..
Step 3 – Undertaking the Laser Scanning
A successful laser scanning process is the key, to allow the service provider to continue on to high-quality Scan to BIM Services.
- Scanning Strategy:
- Select areas to place the scanners, always considering a 360° scan, and try to minimize occlusion.
- Use reference targets or spheres to register scans accurately.
- Best Practice for Data Capture:
- Allow at least 30% overlap between scans (however, more overlap is usually better).
- If you need texture mapping, then you should capture highly detailed panoramas.
- Quality Management During Scanning:
- In order to ensure scanning competence, you should check the lasers and scan data as it is being collected for areas of excessive noise or shadowing.
- You can re-scan these areas again after the fact.
Step 4 – Point Cloud Data Processing
Point cloud processing makes sure that the point cloud data is cleaned, accurate, and suitable to convert through Scan to BIM.
- Registration & Alignment:
- Use industry-standard tools (Autodesk ReCap, Leica Cyclone) to register multiple point clouds to stitch them together in a common coordinate system.
- Eliminate outliers and background noise to provide additional accuracy to the model.
- Exporting Data for BIM:
- Once the point clouds have been processed and cleaned, they can be converted to a format that is compatible with the Land Surveyor and BIM/Site Designers (i.e., .RCP, .E57, or .PTS) to be used in Revit or other BIM Applications.
- Ensure everything is set up the same with georeferencing and coordinate system per specifications.
Step 5 – BIM Modeling from Scan Data
The overall objective of converting the point clouds into intelligent BIM models is the foundation of all Scan to BIM Services.
- Choosing BIM Software:
- Choose between various platforms, Autodesk Revit, Bentley Systems. Ensure that the previous platform choice takes into consideration interoperability.
- BIM Modeling Workflow:
- Extract appropriate elements such as walls, floors, roofs, MEP systems and structural from a point cloud directly with dimensions and relatively easily.
- Constantly ensure you validate geometry and dispositions of the point cloud.
- QA/QC in BIM Modeling:
- Cross-check the model against raw scan data to confirm information is accurate.
- Correct any discrepancies found in the early modeling process before moving downstream.
Step 6 – Deliverables & Hand-over
The final step (Step 6) of Best Scan to BIM Services in the USA is to deliver data-rich and usable output that satisfies client expectations.
- BIM Model Final Requirements:
- Deliver model files at the specified LOD (e.g., LOD 300 for coordination, LOD 400 for fabrication).
- Delivery files must comply with client and local government formats and standards.
- Collaboration & Clash Detection:
- Bundle the model together and import it into a file sharing/screening environment like Navisworks or BIM 360 to prepare for multi-disciplinary coordination and perform a clash check.
- Handover and Reporting:
- Provide complete deliverables – as-built BIM, 2D plans, and reports of scans with model memos and metadata with model specifications.
Common Challenges & Solutions in Scan to BIM Projects
Even when using high quality tools, Scan to BIM projects may experience critical issues if they aren’t managed appropriately:
- Poor Scan Coverage: We will lose data when any of the scans are either incomplete or obstructed. The simplest way to mitigate this is to plan the scanning strategically in advance; appropriate overlap on the scans, and good old fashion targets help with registration, etc.
- Over-doing or Under-Modeling: Modeling either too many or too few parts, which can impact cost as well as usability. If the owner clearly defined the LOD (Level of detail) and scope before we are about to model, the process is much easier and centered on purpose and the ultimate plan as an end deliverable.
- Misalignment Between Scan and Model: A point cloud is never registered properly to the existing visual of the environment leads to a discrepancy. To mitigate this use a reliable registration tool, and carry on QA/QC throughout the modeling to maintain accuracy of position in space.
- Miscommunication with Stakeholders: Delays in responses and proposed changes can happen due to misunderstandings with the many stakeholders involved in the project. Regular updates, modeling reviews with stakeholders, and detailed specifications improve collaboration and reduce the processes that need altering.
Getting ahead of these areas of development improves efficiency, reduces errors and optimizes the ROI of Scan to BIM Services.
Conclusion
The first step in a successful Scan to BIM project is to define the scope for the work, followed by the site preparation, laser scanning, point cloud processing, modeling (with some form of QA or QC), and then allowing sufficient time to deliver the finished model to the correct stakeholders. We at Scan To BIM have learned that in today’s advanced age of AI and automation, Scan to BIM Services will improve, become speedier, smarter, and more valuable to the AEC sector. From future applications for predictive clash detection and auto modeling to being able to deliver seamless real time digital twins. Planning for the future while appropriate planning is a requirement for us all! Planning is still the single best way to reduce risk, enhance accuracy, and maximize your ROI in Scan to BIM Services in the USA.